


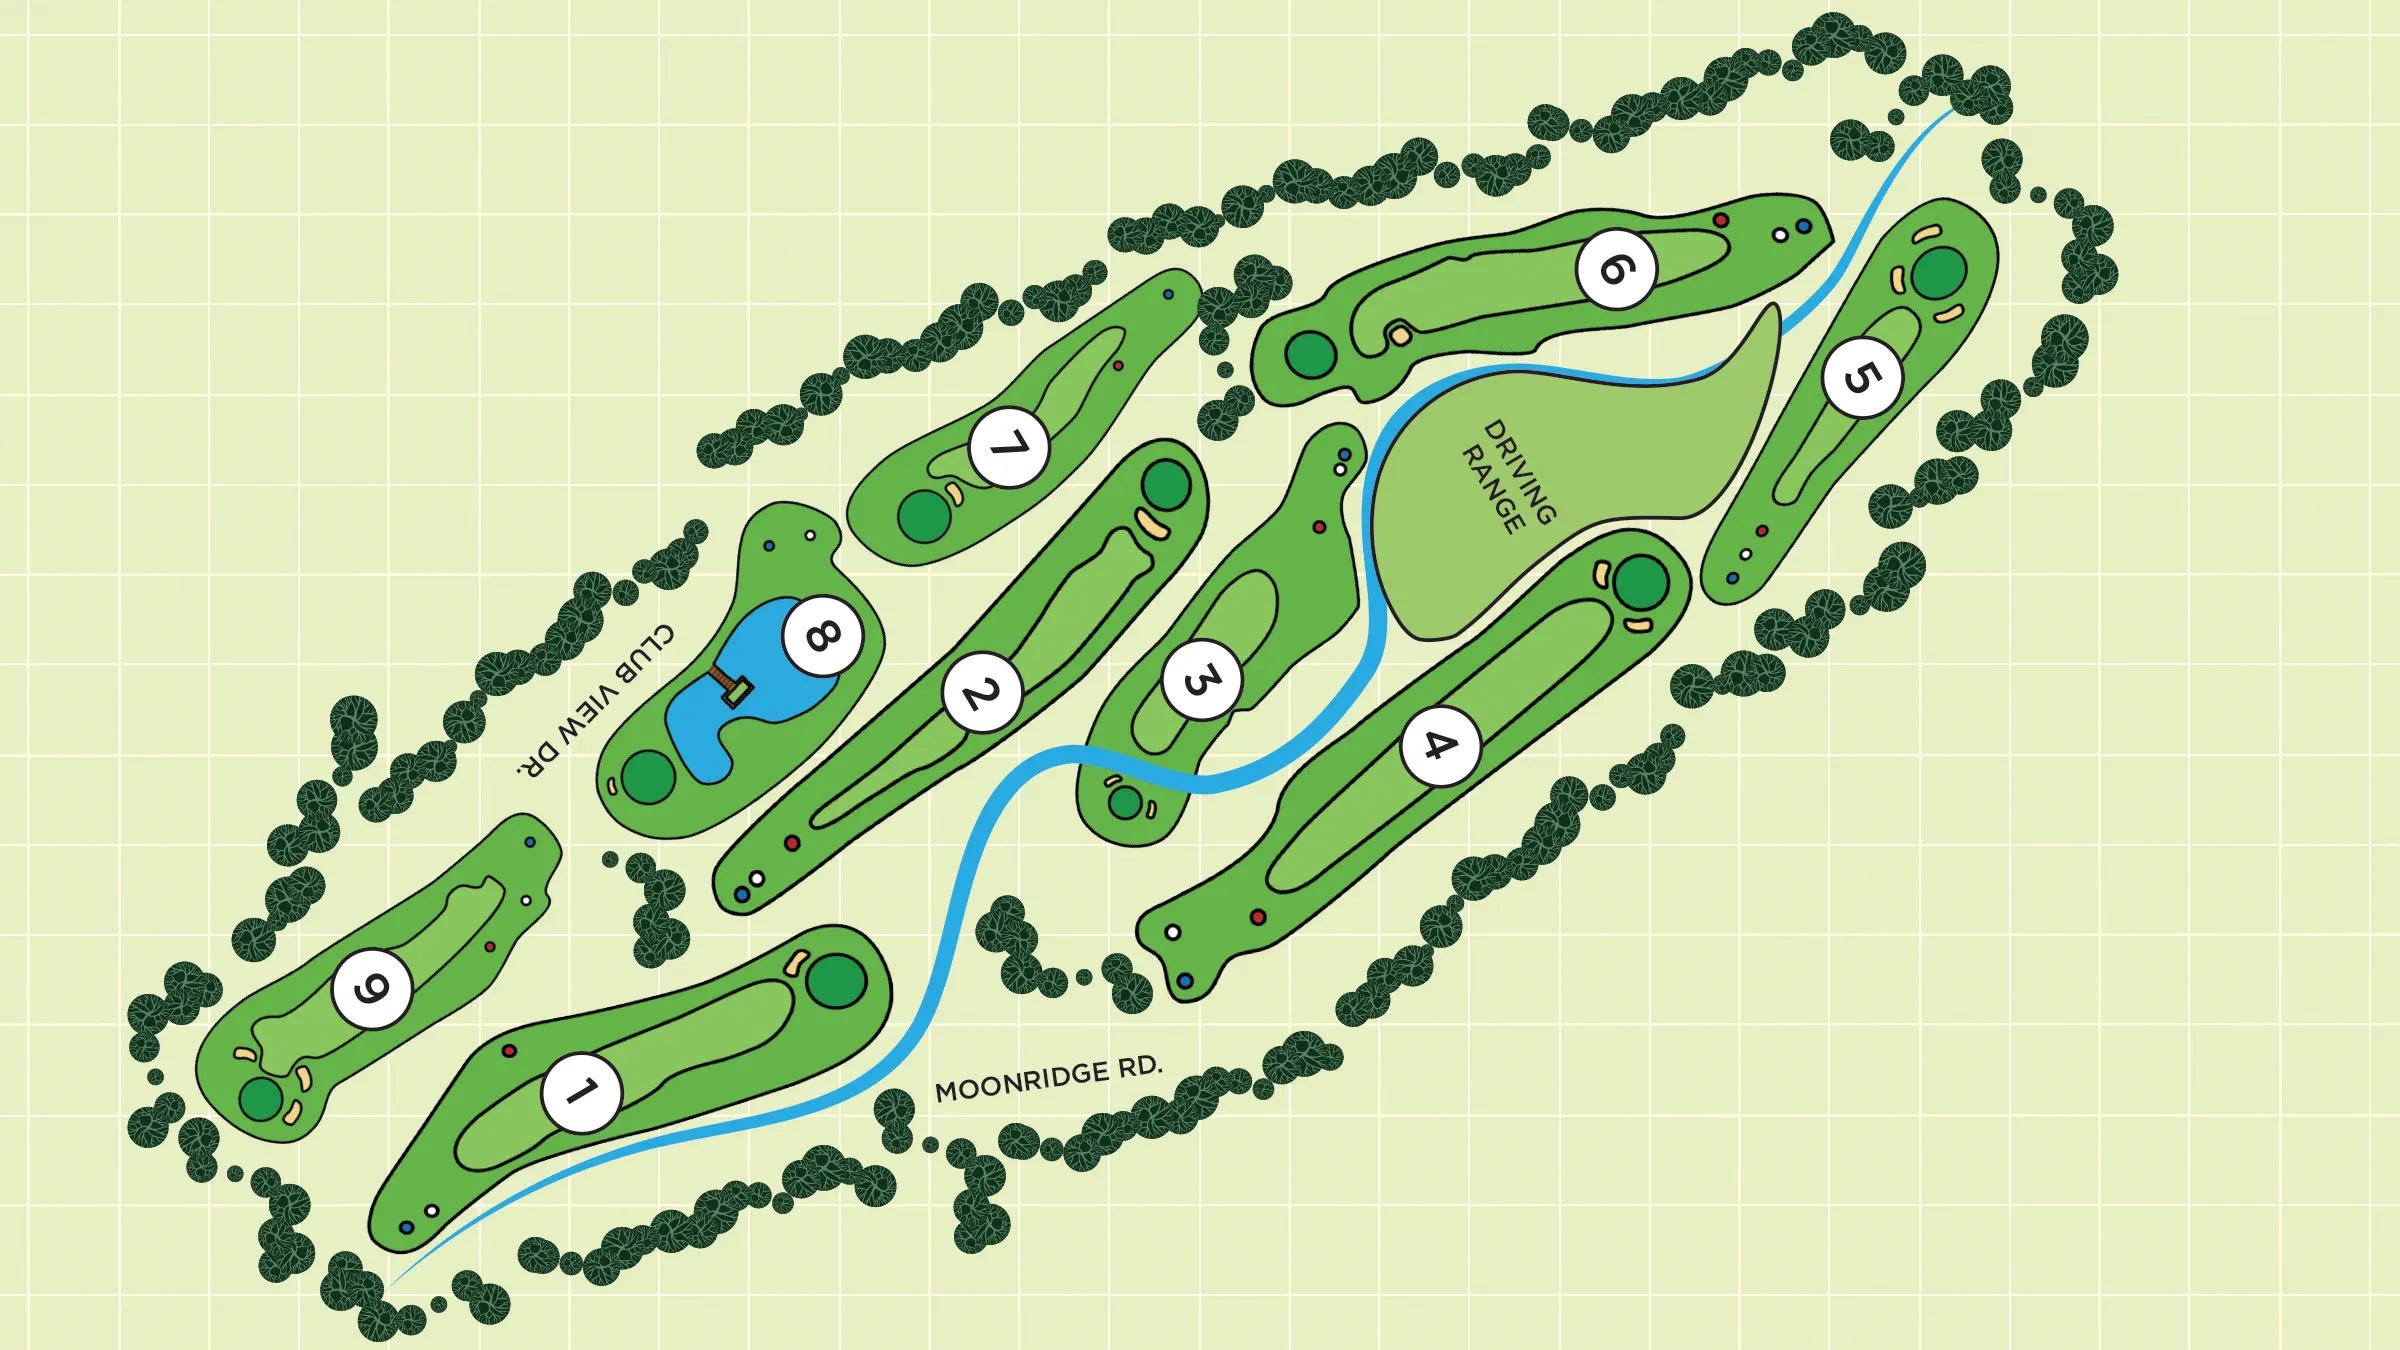
Course Overview
What to Expect on the Course


9 Hole | Par 35
Length
| Tee | Length |
|---|---|
| Red | 2,180 Yards |
| White | 2,573 Yards |
| Blue | 2,783 Yards |
Men's Course
| Tees | Rating |
|---|---|
| Forward | 60.6/99 |
| Middle | 64.4/108 |
| Back | 66.0/112 |
Women's Course
| Tees | Rating |
|---|---|
| Forward | 66.0/113 |
| Middle | 70.4/121 |
| Back | 72.0/125 |
Topography
- Rolling Hills
- Tree-Lined Fairways
Greens
- Bent grass
- Poa Annua grass
Tees
- Rye Grass
Practice
- Driving Range
- Putting
- Chipping Area
Hole 1
 Back: 379
  Middle: 368
  Forward: 238
The 1st hole at Bear Mountain Golf Course is a relatively straightforward par 4 with open sight lines and boundary hazards on both sides of the fairway. A well-placed drive past the fir trees on the player’s right and private residences on the left will leave a welcoming approach shot to a right-to-left sloped green with front-left bunker. rich-text, responsive-table
The 1st hole at Bear Mountain Golf Course is a relatively straightforward par 4 with open sight lines and boundary hazards on both sides of the fairway. A well-placed drive past the fir trees on the player’s right and private residences on the left will leave a welcoming approach shot to a right-to-left sloped green with front-left bunker. rich-text, responsive-table
Hole 2
Back: 512 Middle: 470 Forward: 238
The first of two par fives, the 2nd hole features a moderately elevated tee box and slight dogleg left finish. Tee shots should avoid the tree-lined hazard to player’s left and boundary line on the right to setup an approach shot or chance to reach the green, which slopes back-to-front with a front side bunker for good measure. rich-text, responsive-table
The first of two par fives, the 2nd hole features a moderately elevated tee box and slight dogleg left finish. Tee shots should avoid the tree-lined hazard to player’s left and boundary line on the right to setup an approach shot or chance to reach the green, which slopes back-to-front with a front side bunker for good measure. rich-text, responsive-table
Hole 3
Back: 344 Middle: 285 Forward: 259
Hole 3 is a par 4 with plenty of fairway to the player’s right and a tree boundary to the left. Players should avoid the extended natural terrain bunker on the left side of the fairway and lateral hazard when approaching the elevated green that slopes slightly back-to-front with a front-right bunker. rich-text, responsive-table
Hole 3 is a par 4 with plenty of fairway to the player’s right and a tree boundary to the left. Players should avoid the extended natural terrain bunker on the left side of the fairway and lateral hazard when approaching the elevated green that slopes slightly back-to-front with a front-right bunker. rich-text, responsive-table
Hole 4
Back: 463 Middle: 448 Forward: 412/401
The second par 5 on the course, the 4th hole features a wide-open fairway and boundary hazards on each side. Wind can be a factor when teeing off from the elevated white and blue boxes, with heavy rough on the left side of the fairway and unattended natural terrain to the right. Players’ 2nd shot should leave a manageable 3rd approach to a relatively level green with a front-right bunker. rich-text, responsive-table
The second par 5 on the course, the 4th hole features a wide-open fairway and boundary hazards on each side. Wind can be a factor when teeing off from the elevated white and blue boxes, with heavy rough on the left side of the fairway and unattended natural terrain to the right. Players’ 2nd shot should leave a manageable 3rd approach to a relatively level green with a front-right bunker. rich-text, responsive-table
Hole 5
Back: 138 Middle: 128 Forward: 123
The 1st of three par threes, the 5th hole has boundary hazards to the left, right, and rear, and bunkers on both sides of the large, front-to back sloped green. rich-text, responsive-table
The 1st of three par threes, the 5th hole has boundary hazards to the left, right, and rear, and bunkers on both sides of the large, front-to back sloped green. rich-text, responsive-table
Hole 6
Back: 382 Middle: 361 Forward: 333
The 6th hole is a slightly uphill par 4 with tree-lined lateral hazard on the left and boundary on the right. A well-placed tee shot will leave players with a mid-range approach to a moderately rounded green with bunkers on the right and front-left. rich-text, responsive-table
The 6th hole is a slightly uphill par 4 with tree-lined lateral hazard on the left and boundary on the right. A well-placed tee shot will leave players with a mid-range approach to a moderately rounded green with bunkers on the right and front-left. rich-text, responsive-table
Hole 7
Back: 180 Middle: 144 Forward: 101
A challenging par 3 with undulating terrain and tall fir trees on the right of the multi-tiered putting surface, the 7th hole requires precision off the tee and creativity on the green. rich-text, responsive-table
A challenging par 3 with undulating terrain and tall fir trees on the right of the multi-tiered putting surface, the 7th hole requires precision off the tee and creativity on the green. rich-text, responsive-table
Hole 8
Back: 133 Middle: 121/117 Forward: 55
The final par 3 on the course, the 8th hole features the course’s only water hazard. The expansive, multi-tiered green is deceptively demanding, with little room for error on the front side and a front-right bunker for good measure. rich-text, responsive-table
The final par 3 on the course, the 8th hole features the course’s only water hazard. The expansive, multi-tiered green is deceptively demanding, with little room for error on the front side and a front-right bunker for good measure. rich-text, responsive-table
Hole 9
Back: 252 Middle: 248 Forward: 221
Bear Mountain’s finishing hole – the 9th – is a par 4 with boundary hazards on both sides of the fairway and pronounced uphill pitch. From the tee, players must navigate the relatively narrow fairway with fir trees on the player’s right and residences on the left to setup a 2nd shot to the heavily rounded green featuring bunkers on the left and front-right. rich-text, responsive-table
Bear Mountain’s finishing hole – the 9th – is a par 4 with boundary hazards on both sides of the fairway and pronounced uphill pitch. From the tee, players must navigate the relatively narrow fairway with fir trees on the player’s right and residences on the left to setup a 2nd shot to the heavily rounded green featuring bunkers on the left and front-right. rich-text, responsive-table
 rich-text, responsive-table
Get Started
rich-text, responsive-table


